Orders Management
The Orders module is the heart of your tailoring business. Create, track, and manage all customer orders from a single, intuitive interface. Assign staff, track payments, and generate bills.
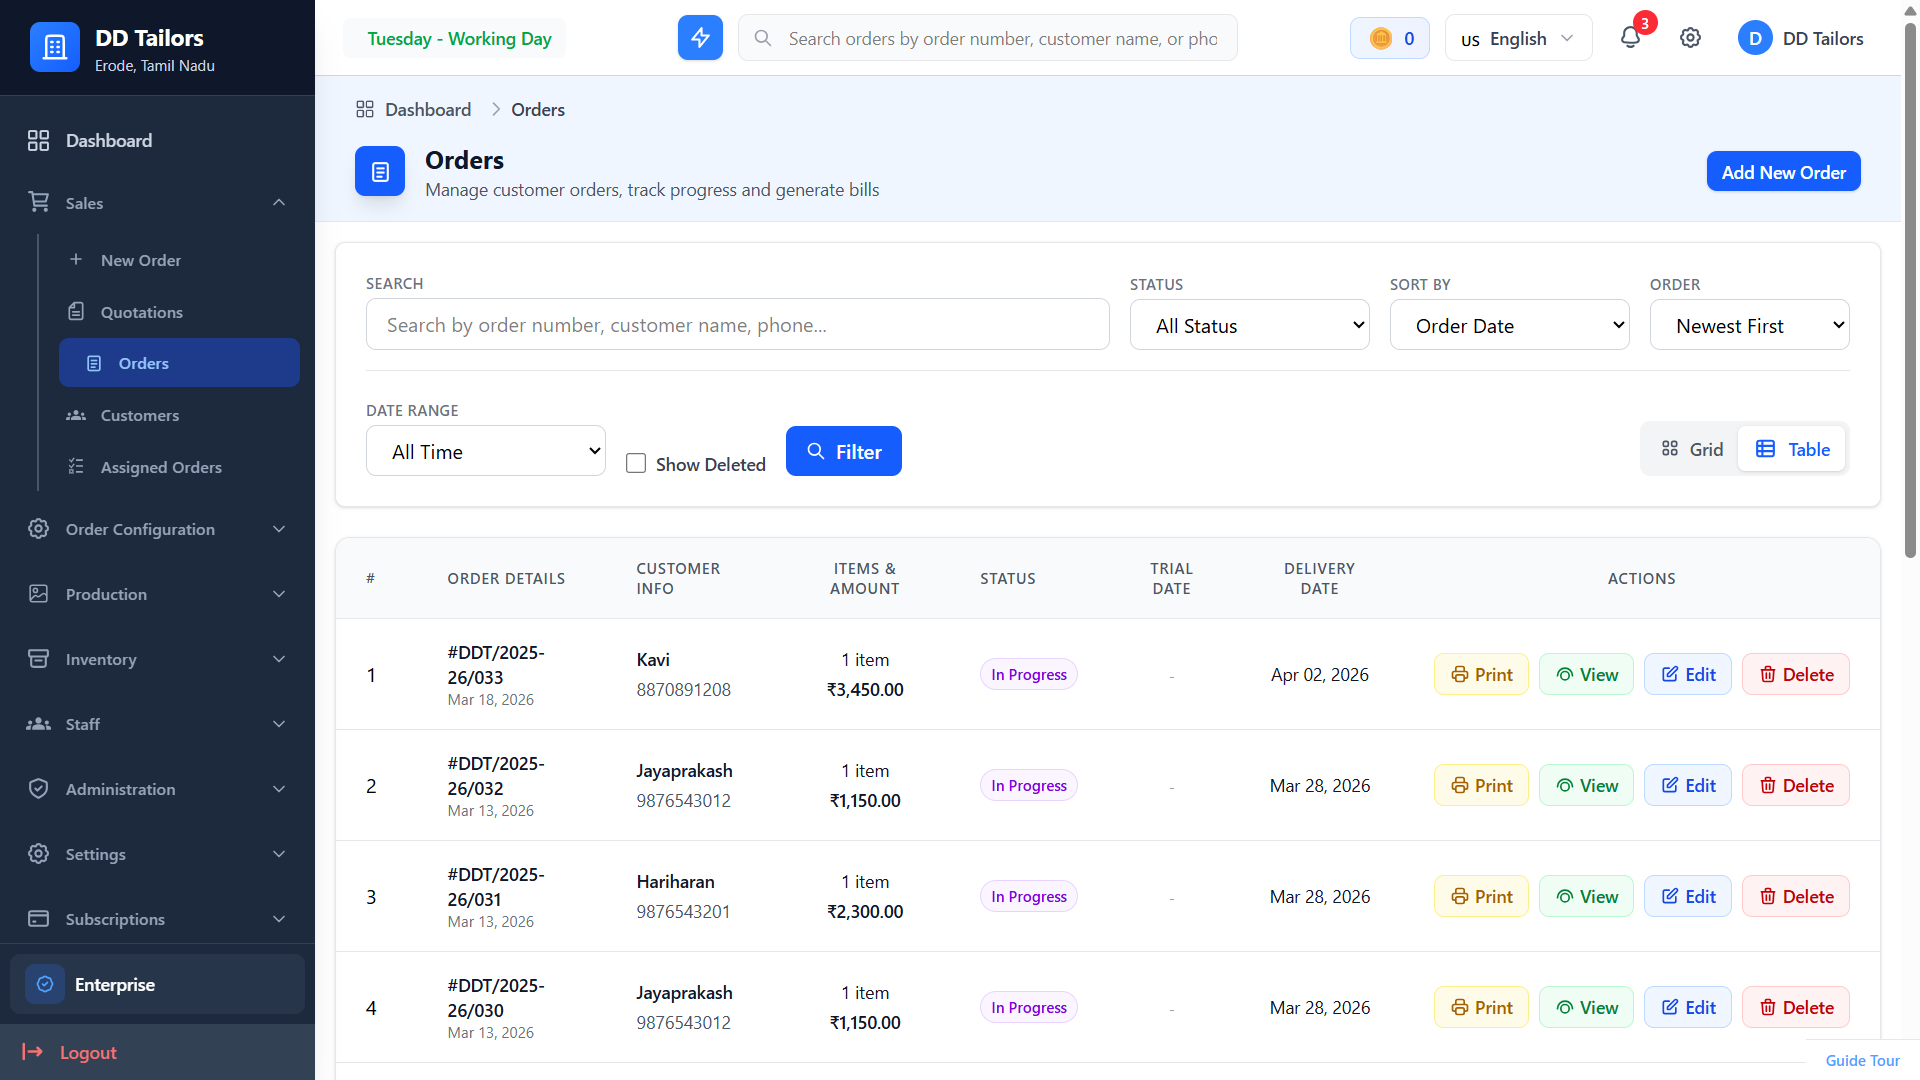
Orders list with filters and status columns
Understanding Orders
Order Structure
Each order contains:
- Customer/Family Member - Who the order is for
- Order Items - Multiple garments per order
- Units per Item - Quantity of each garment
- Measurements - Saved or custom measurements
- Trial & Delivery Dates - Scheduled timelines
- Staff Assignments - Which staff works on each unit
- Additional Parameters - Set additional parameters for additional charges
- Redeem Points - Points that can be redeemed for discounts
- Payment Methods - Multiple payment options available
Order Status Workflow
Orders can be configured with custom statuses. Status updates can be (configurable in store settings):
- Order-wise - Status applies to entire order
- Item-Wise - Status applies to individual items within the order
- Unit-wise - Each unit can have different status
Common Status Flow
Just received - awaiting review and assignment
Actively being worked on by assigned staff
Complete and ready for customer pickup
Customer has received the completed garment
Customer cancelled - order no longer active
Creating a New Order
DD Tailors offers two order creation interfaces to suit different preferences. You can switch between them using the link at the top of the page.
Classic Order Form
The classic form provides a traditional step-by-step approach with three main steps:
Step 1: Customer Selection
In the first step, you select the customer and family member for the order:
- Navigate to Orders from the main menu
- Click the + New Order button
- Select an existing customer from the dropdown
- Choose a family member
- Or create a new customer if needed
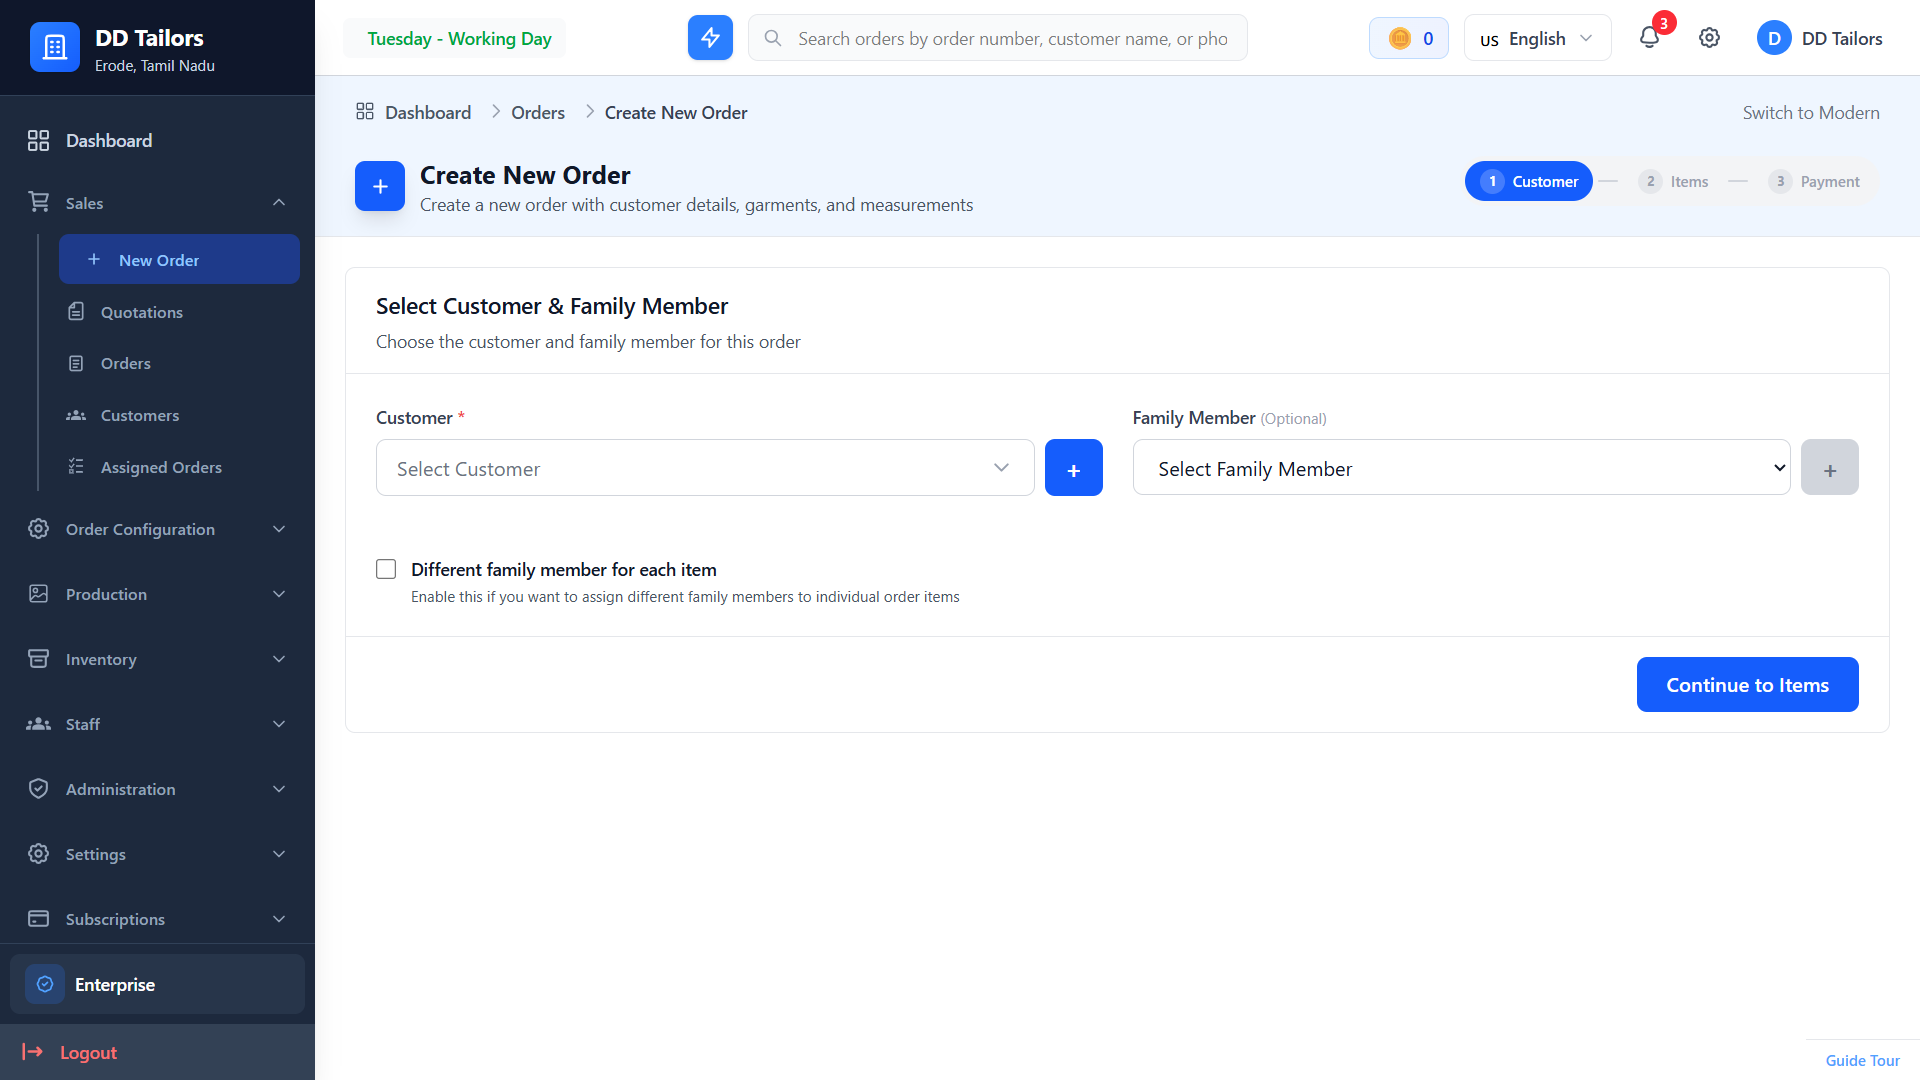
Step 1: Customer and family member selection
Step 2: Order Items
In the second step, you add garment items to the order:
- Select garment type (Shirt, Pant, Coat, etc.)
- Enter custom measurements
- Set item price and quantity
- Add reference and material images if available
- Add special instructions for each item (Optional)
- Click + Add Another Item to add more garments
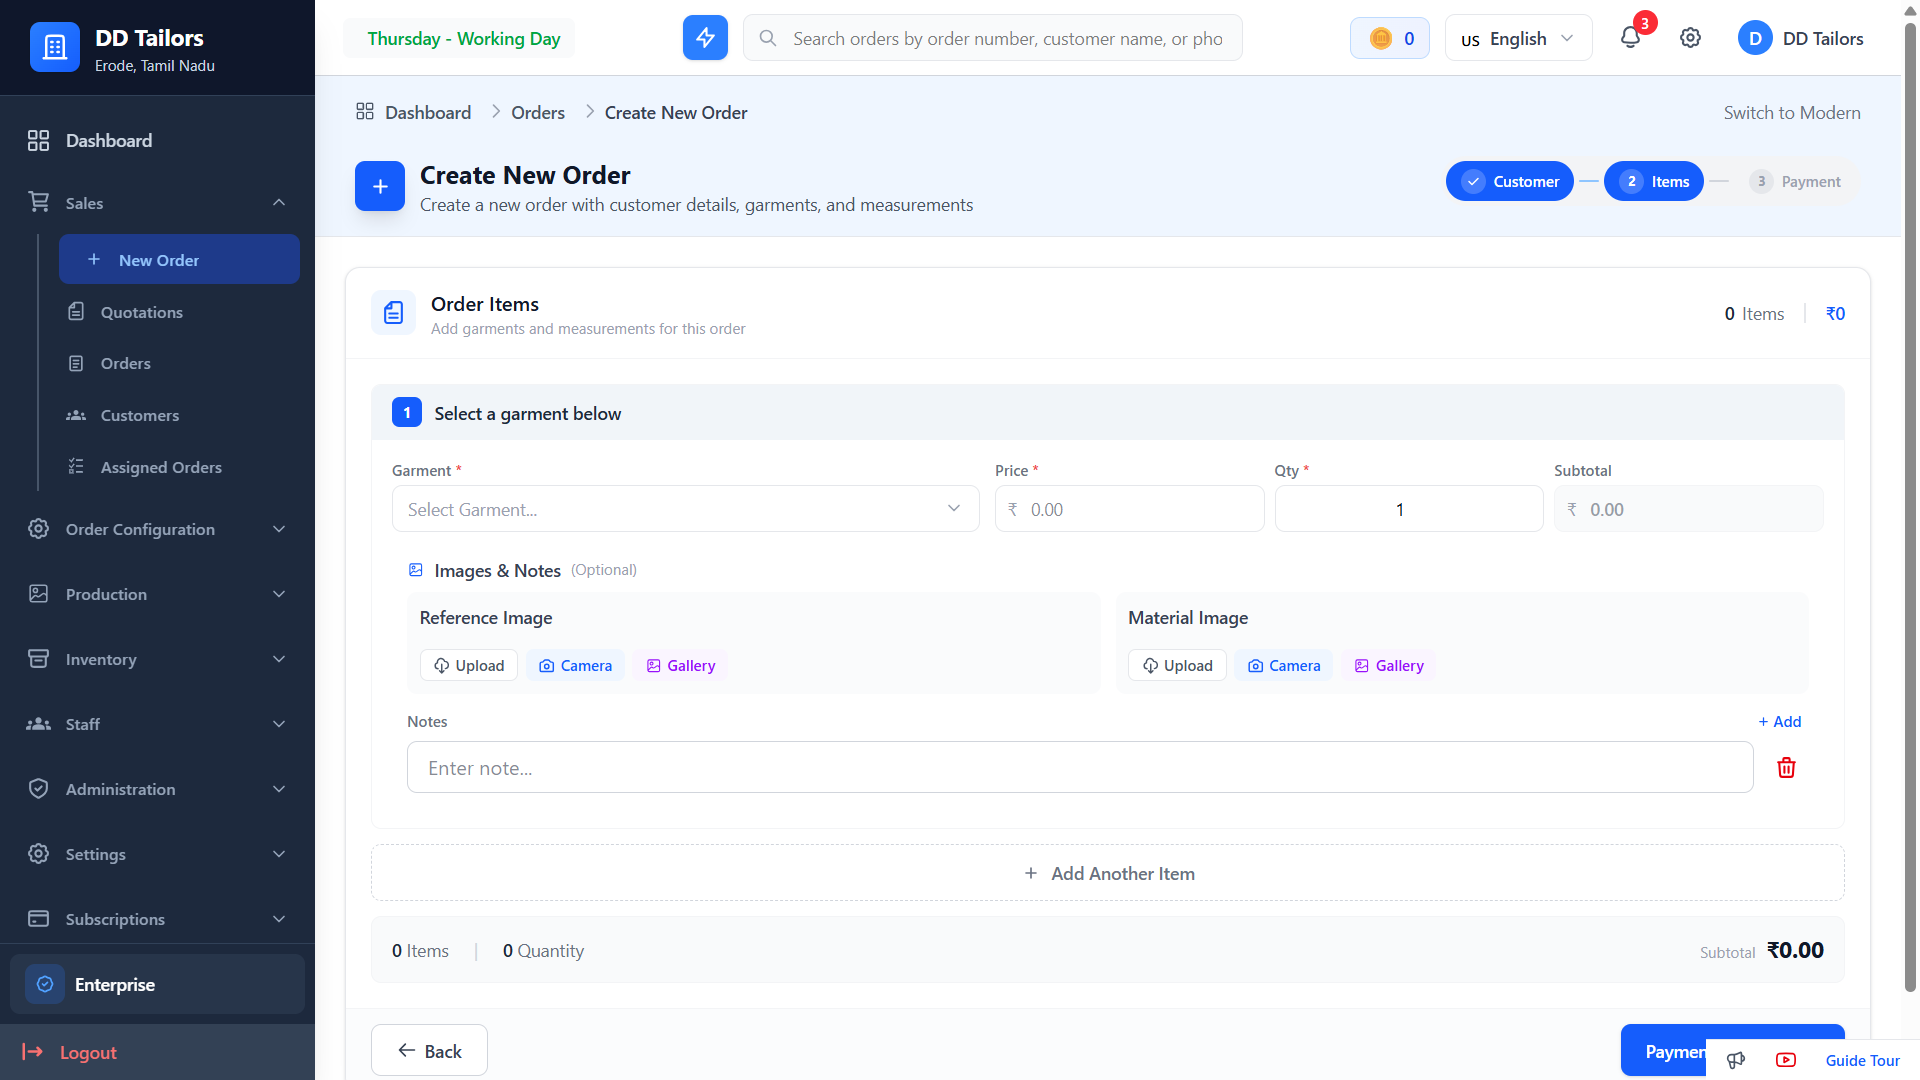
Step 2: Adding order items and measurements
Step 3: Payment & Dates
In the final step, you configure payment and important dates:
- Set Trial Date for fitting (if applicable)
- Set Delivery Date for final pickup
- Enter advance payment amount
- Select payment method
- Add order notes and special instructions
- Review order summary
- Click Create Order to save
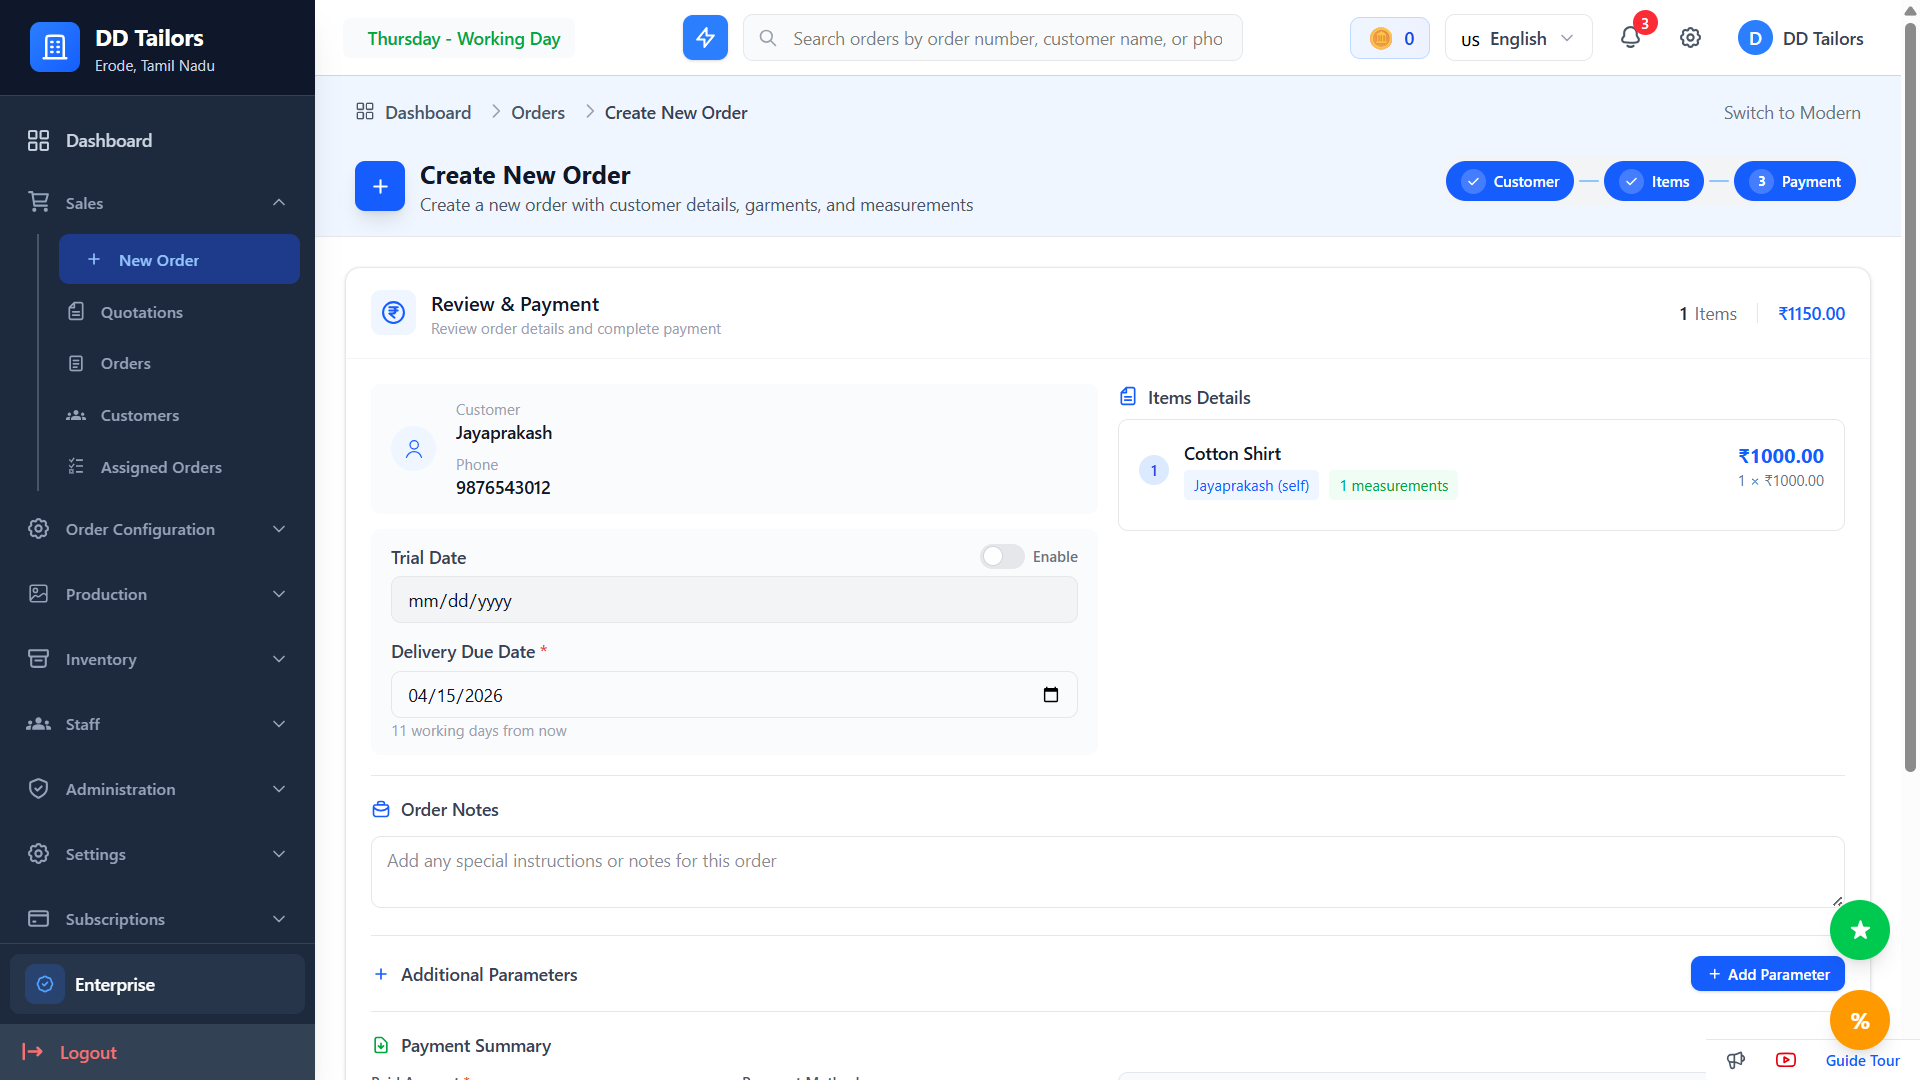
Step 3: Payment details and dates
Modern Order Form
The modern form offers a streamlined, single-page experience with keyboard shortcuts:
- Quick Customer Selection - Select customers instantly or create a new one
- Trial & Delivery Dates - Set dates for fittings (Optional) and deliveries
- Inline Item Addition - Add multiple items without page refresh
- Measurement - Enter custom measurements for each item
- Notes & Instructions - Add notes and special instructions for each item
- Keyboard Shortcuts - Press ? to view shortcuts
- Real-time Total - See order total update as you add items
- Additional Parameters - Set additional parameters for additional charges
- Redeem Points - Points that can be redeemed for discounts
- Payment Methods - Multiple payment options available
- Sticky Header - Quick access to save button while scrolling
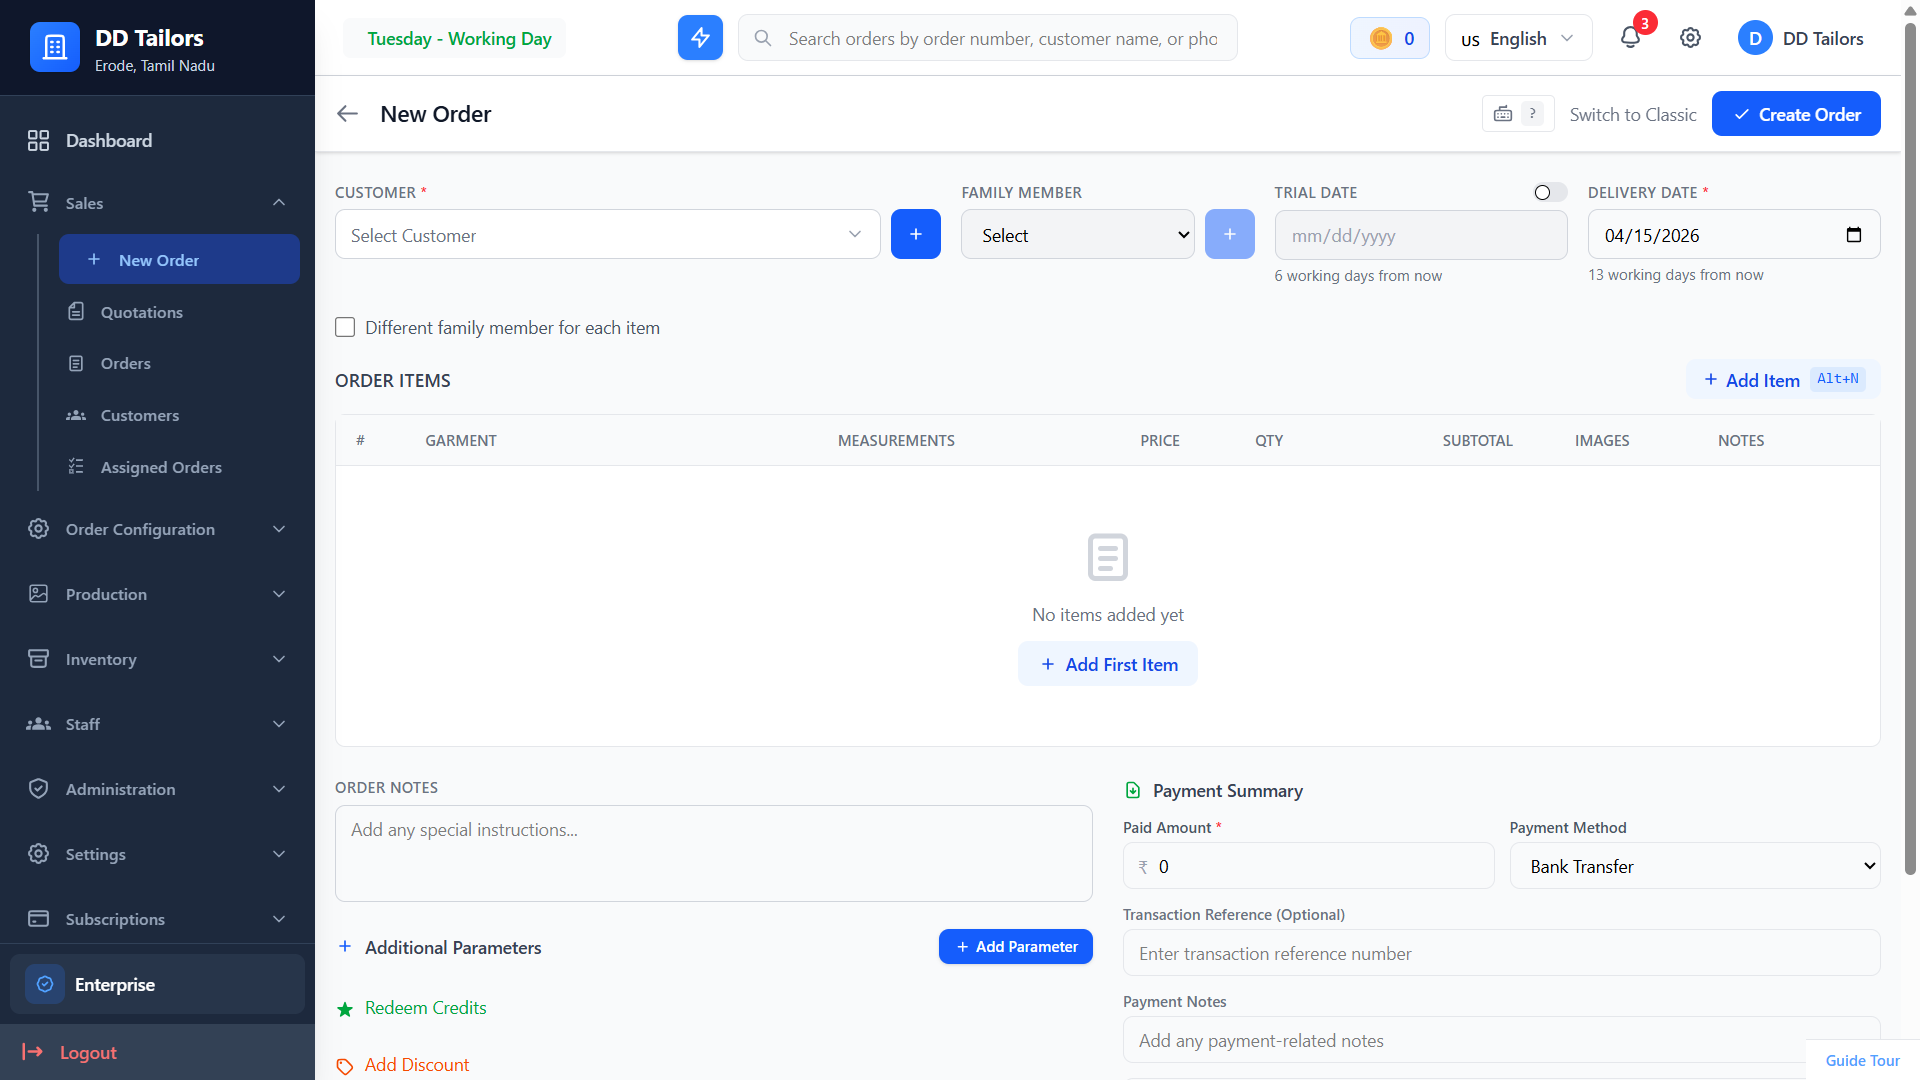
Modern order creation form
Click "Switch to Modern" or "Switch to Classic" at the top of the order creation page to toggle between interfaces. Your preference is remembered for future visits.
Managing Orders
View All Orders
The Orders list shows all your orders with quick filters and sorting options:
- Filter by Status - Show only pending, in progress, completed, or delivered orders
- Filter by Date - View orders from a specific date range or custom date range
- Search - Find orders by customer name or order number
- Sort - Order by trial date, order date, or delivery date
View Order Details
Click on any order to view complete details including customer information, measurements, timeline, and notes. You can also update the order status and edit orders here.
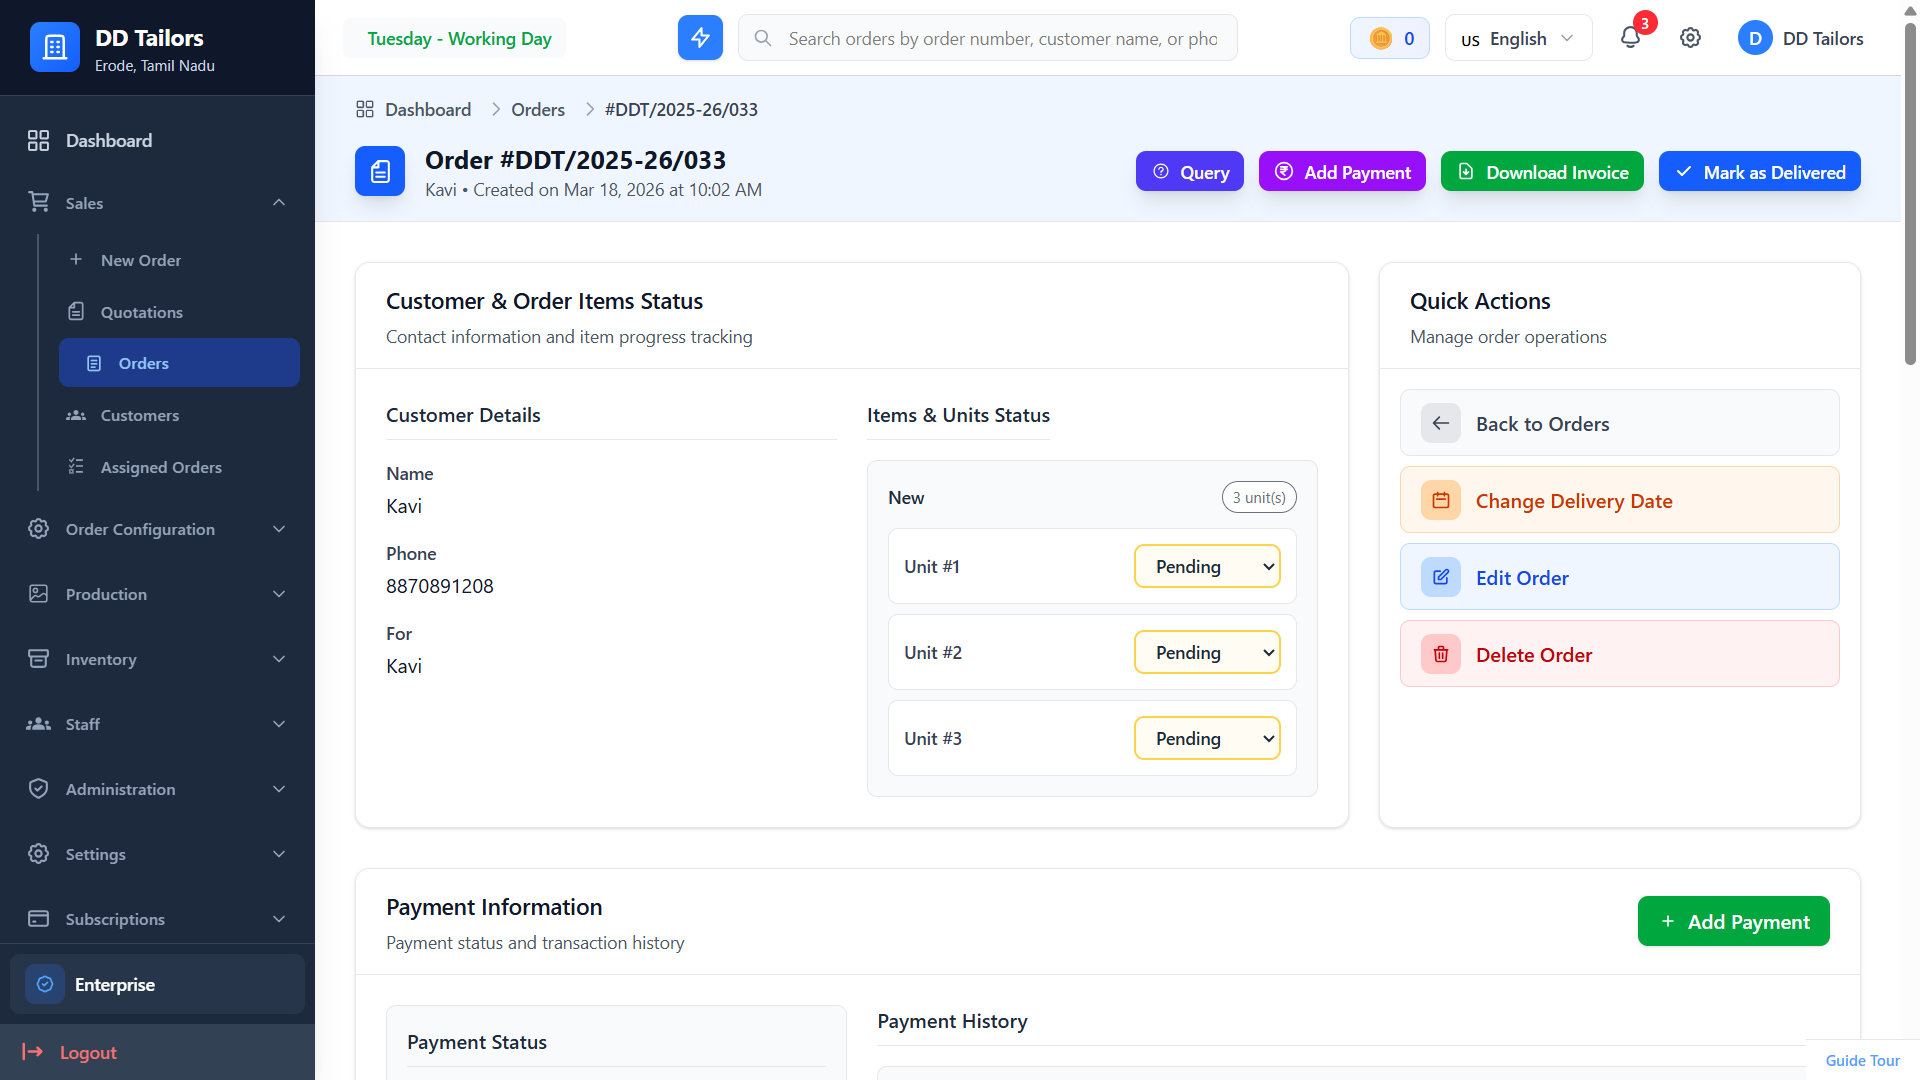
Order details page with all information
Update Order Status
To change an order's status:
- Open the order details
- Click the Status dropdown
- Select the new status (automatically updates)
Order Actions
Available Actions
- Assign Staff - Assign staff to work on order units
- Query - Submit queries about the order
- Add Payment - Record customer payments
- Download Invoice - Get PDF invoice of customer, staff, combined invoices
- Change Delivery Data - Update delivery dates
- Edit Order - Modify order details
- Delete Order - Temporarily remove or permanently delete orders
Staff Assignments
Assign specific staff members to work on order units:
- Open the order details page
- For item, click "Assign Staff"
- Select staff member from the dropdown (filtered by staff group)
- Staff can mark assignments as issued, received, or unassigned
- Track completion status per unit
Payment Tracking
Record multiple payments per order:
- Add partial or full payments
- Select payment method (Cash, Card, UPI, etc.)
- Track outstanding balance
- Edit or delete payments if needed
Order Tips & Best Practices
Accurate measurements are crucial. Use the notes section to record any special requests or customer preferences to avoid remakes.
Always give yourself adequate time. Consider fabric type, garment complexity, and your current workload when setting delivery dates.
Regularly update order statuses. This helps you track progress and keeps customers informed about their orders.
Use order notes to communicate with your team about special requirements, priority orders, or quality checks needed.
Update order status regularly so customers can track progress. Good communication builds customer trust and loyalty.
Frequently Asked Questions
Can I edit an order after it's created?
How do I assign staff to work on an order?
Can I record partial payments?
How do I delete or cancel an order?
What is the trial date feature?
What's Next?
Now that you've created orders, here's the recommended next step: